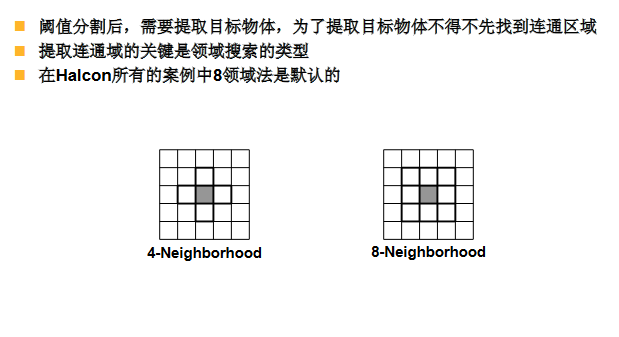
CH17_图像基本操作
图像基本操作
基础操作-Blob分析
介绍:
**Blob分析**是一种用于检测和分析图像中具有相似颜色、纹理等特征的连通区域的计算机视觉技术。Blob(Binary large object)是指图像中的一块连通区域,通常通过二值化处理将前景和背景分离,然后进行连通区域检测,从而得到Blob块。
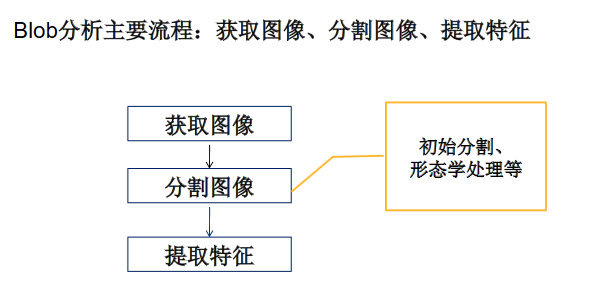
Blob分析的基本概念和实现流程
- 获取图像:通过相机设备获取原始图像。
- 提取Blob:根据需求提取要分析的目标二值区域。
- Blob分析:对提取出来的二值区域进行特征分析,如面积、周长、重心等。
Blob分析的应用场景和优缺点
- 应用场景:Blob分析常用于二维目标图像、高对比度图像、存在/缺陷检测等。例如,在纺织生产中,通过Blob分析可以检测布料上的孔洞、裂缝等瑕疵。
- 优点
- 通过Blob提取,可以获得相关区域的信息,这些信息可以作为边缘监测器或者角点检测器的补充信息。
- Blob还可以作为纹理分析和纹理识别的基元。
- 缺点
- 速度较慢,需要逐点扫描整个区域。
- 分析难度大,特别是对于不规则形状的计算。
- 实际应用中依赖可靠的光源设计。
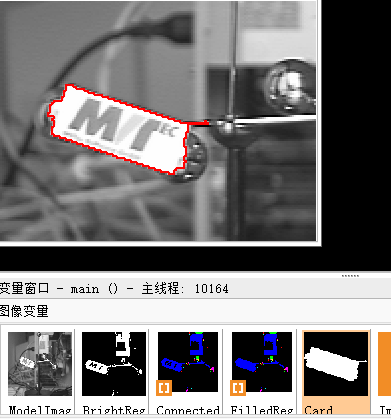
Blob分析在机器视觉中的具体应用实例
在机器视觉中,Blob分析常用于目标识别和跟踪。例如,在玻璃生产线上,通过Blob分析可以检测玻璃表面的瑕疵,如黑斑、裂缝等。这些检测结果可以帮助生产过程中及时发现并解决质量问题。
使用方法:
课堂的代码之Blob分析例程:
1 | * ------------------------------------------------------------------------------------------------ |
额外的一些比较重要的地方:
Blob分析 不是一个算子的意思,其实是对整个图像的目标物进行的一系列的操作,最终拿到我们想要的区域对象或者是拿到我们想要的 区域对象的特征(长、宽、是否像圆、是否像方形、长宽比、面积..)
区域的存储:
1.write_object(obj,path) 写区域到本地
2.read_object(obj,path) 读区域到本地
特别注意 区域是否超出了 halcon的边界 如果超出了 你是需要加载一个超大的 空的图 把边界撑大。
图像基础-分割(Segmentation)
介绍 :
图像或者照片中,一般存在主人公和背景。我们把主人公叫做前景。比方当下很火的P图,换脸,提取照片或者图像上的某物,我们在halcon中就说是把前景和背景分开。
使用方法:
1.根据前景和背景的状态 选择合适的处理算子来进行分割操作。
算子分析:
全局阈值 threshold
全局阈值是最简单的阈值分割方法,适用于图像中目标和背景的灰度差异较大的情况。通过设定一个固定的阈值,将图像分为前景和背景两部分。
*实现方法**:
- 使用
threshold算子,设定一个全局阈值。 - 例如:
threshold(Image, Region, MinGray, MaxGray) Image是输入图像,Region是输出区域,MinGray和MaxGray是灰度范围。
- 使用
*适用场景**:
图像中目标和背景的灰度差异明显。
光照均匀,没有明显的阴影或反射。

1
2
3
4
5
6
7
8
9
10
11
12
13
14
15
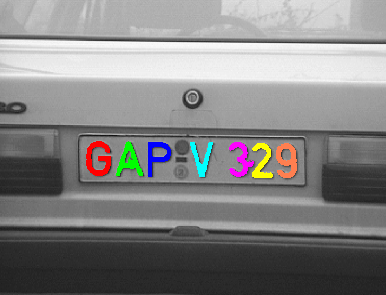
16read_image (Audi2, 'audi2')
*是一种图像处理操作,通常用于处理隔行扫描(Interlaced)视频。隔行扫描是一种视频显示技术
*,常见于早期的模拟电视和部分数字视频中。它的核心思想是将一帧图像分为两个半帧(Field),
*分别称为奇数场(Odd Field)和偶数场(Even Field),
*然后交替显示这两个半帧,以减少带宽需求并提高显示流畅度。
*图像预处理 把老式摄像机拍的锯齿 去除
fill_interlace (Audi2, ImageFilled, 'odd')
*全局阈值分割
threshold (ImageFilled, Region, 0, 90)
connection (Region, ConnectedRegions)
select_shape (ConnectedRegions, SelectedRegions, 'width', 'and', 30, 70)
select_shape (SelectedRegions, Letters, 'height', 'and', 60, 110)
dev_clear_window ()
dev_set_colored (12)
dev_display (ImageFilled)
dev_display (Letters)
基于直方图的自动阈值分割方法 binary_threshold
基于直方图的自动阈值分割方法通过分析图像的灰度直方图,自动确定最佳阈值。常见的方法包括 Otsu 方法(大津法)、最大类间方差法等。
Otsu 方法(大津法)是一种经典的自动阈值分割算法,由日本学者大津展之(Nobuyuki Otsu)在 1979 年提出。它的核心思想是通过最大化类间方差(inter-class variance)来自动确定图像的最佳分割阈值,适用于将图像分为前景和背景两部分。
*实现方法**:
使用
binary_threshold算子,选择自动阈值方法。例如:
binary_threshold(Image, Region, 'max_separability', 'light', UsedThreshold)‘max_separability’
表示使用 Otsu 方法 也叫大津法,‘light’` 表示目标比背景亮。适用场景**:
图像直方图呈现双峰分布。
需要自动确定阈值,避免手动调整。
- ```
Init display
dev_update_off ()
dev_close_window ()
dev_open_window (0, 0, 512, 512, ‘black’, WindowHandle)
set_display_font (WindowHandle, 14, ‘mono’, ‘true’, ‘false’)
ImageFiles := [‘dip_switch/dip_switch_01’, ‘circular_barcode’, ‘fin1’]
for I := 0 to |ImageFiles| - 1 by 1
read_image (Image, ImageFiles[I])
dev_resize_window_fit_image (Image, 0, 0, -1, -1)
dev_display (Image)
Message := ‘Test image for binary_threshold’
disp_message (WindowHandle, Message, ‘window’, 12, 12, ‘black’, ‘true’)
disp_continue_message (WindowHandle, ‘black’, ‘true’)
stop ()- ‘max_separability’ 小日子的大津法 Otsu
- 自动直方图阈值分割算子 把图像的直方图归纳成了两个类 一个是暗的 一个是亮的。然后你自己来选择到底要亮的
*还是要暗的 - This method separates the histogram of the input image into
- two classes and performs a global thresholding operation
- to segment one class.
binary_threshold (Image, RegionMaxSeparabilityLight, ‘max_separability’, ‘light’, UsedThreshold)
- 自动直方图阈值分割算子 把图像的直方图归纳成了两个类 一个是暗的 一个是亮的。然后你自己来选择到底要亮的
- ‘max_separability’ 小日子的大津法 Otsu
complement (RegionMaxSeparabilityLight, RegionComplement)
- Display results
dev_display (Image)
dev_display (RegionMaxSeparabilityLight)
Message := ‘Bright background segmented globally with’
Message[1] := ‘Method = 'max_separability'‘
Message[2] := ‘Used threshold: ‘ + UsedThreshold
disp_message (WindowHandle, Message, ‘window’, 12, 12, ‘black’, ‘true’)
disp_continue_message (WindowHandle, ‘black’, ‘true’)
stop () - 这个算子同样运行你选择 暗的部分
- It is also possible to segment dark areas
binary_threshold (Image, RegionMaxSeparabilityDark, ‘max_separability’, ‘dark’, UsedThreshold) - Display results
dev_display (Image)
dev_display (RegionMaxSeparabilityDark)
Message := ‘Dark foreground segmented globally with’
Message[1] := ‘Method = 'max_separability'‘
Message[2] := ‘Used threshold: ‘ + UsedThreshold
disp_message (WindowHandle, Message, ‘window’, 12, 12, ‘black’, ‘true’)
disp_continue_message (WindowHandle, ‘black’, ‘true’)
stop () - 平滑的操作
- ‘smooth_histo’
- 该方法通过对输入图像的直方图进行平滑处理,直到平滑后的直方图中仅剩下一个最小值,
*从而将直方图分为两类。这个最小值的位置决定了阈值。 - This method separates the histogram of the input image into
- two classes by subsequently smoothing its histogram until there
- is only one minimum in the smoothed histogram. The position of
- this minimum determines the threshold.
binary_threshold (Image, RegionSmoothHistoLight, ‘smooth_histo’, ‘light’, UsedThreshold) - Display results
dev_display (Image)
dev_display (RegionSmoothHistoLight)
Message := ‘Bright background segmented globally with’
Message[1] := ‘Method = 'smooth_histo'‘
Message[2] := ‘Used threshold: ‘ + UsedThreshold
disp_message (WindowHandle, Message, ‘window’, 12, 12, ‘black’, ‘true’)
disp_continue_message (WindowHandle, ‘black’, ‘true’)
stop () - Segment dark areas
binary_threshold (Image, RegionSmoothHistoDark, ‘smooth_histo’, ‘dark’, UsedThreshold) - Display results
dev_display (Image)
dev_display (RegionSmoothHistoDark)
Message := ‘Dark foreground segmented globally with’
Message[1] := ‘Method = 'smooth_histo'‘
Message[2] := ‘Used threshold: ‘ + UsedThreshold
disp_message (WindowHandle, Message, ‘window’, 12, 12, ‘black’, ‘true’)
disp_continue_message (WindowHandle, ‘black’, ‘true’)
stop () - endfor
- Display results
这两种方法的差异其实是很小的 但是大津法在某些场合下是比前者要更快地
The difference between both methods is small,
but ‘max_separability’ is faster in most cases.
symm_difference (RegionMaxSeparabilityDark, RegionSmoothHistoDark, RegionDifference)Display difference
dev_display (Image)
dev_display (RegionDifference)
Message := ‘The difference of both methods is small’
Message[1] := ‘- 'max_separability' is less prone to’
Message[2] := ‘ undesired effects caused by over- or underexposure’
Message[3] := ‘- often, 'max_separability' is faster’
Message[4] := ‘- 'max_separability' is only available for’
Message[5] := ‘ byte and uint2 images, while 'smooth_histo'‘
Message[6] := ‘ is available for byte, uint2, and real images’
disp_message (WindowHandle, Message, ‘window’, 12, 12, ‘black’, ‘true’)binary_threshold returns the threshold used for segmentation in UsedThreshold.
The threshold operator with this value returns the same region as
binary_threshold did.
threshold (Image, RegionThreshold, 0, UsedThreshold)
As a consequence the difference between these two regions is empty.
symm_difference (RegionThreshold, RegionSmoothHistoDark, RegionDifference)1
2
3
4
5
6
7
8
9
10
11
12
13
14
15
16
17
18
19
3. 自动全局阈值分割方法     auto_threshold

   自动全局阈值分割方法结合了全局阈值和自动阈值选择的优点,通过算法自动确定全局阈值。

   - *实现方法**:

     - 使用 `auto_threshold` 算子,自动选择多个阈值。
     - 例如:`auto_threshold(Image, Regions, Sigma)`
     - `Sigma` 是高斯平滑参数,用于平滑直方图。

   - *适用场景**:

     - 图像中存在多个灰度级别的目标。

     - 需要自动分割多个区域。
dev_close_window ()
read_image (Aegypt1, ‘egypt1’)
get_image_size (Aegypt1, Width, Height)
dev_open_window (0, 0, Width, Height, ‘black’, WindowID)
set_display_font (WindowID, 14, ‘mono’, ‘true’, ‘false’)
dev_set_colored (6)
dev_clear_window ()
Sigma := 4
auto_threshold (Aegypt1, Regions, Sigma)
gray_histo (Aegypt1, Aegypt1, AbsoluteHisto, RelativeHisto)
disp_continue_message (WindowID, ‘black’, ‘true’)
stop ()
dev_clear_window ()
create_funct_1d_array (AbsoluteHisto, Function)
smooth_funct_1d_gauss (Function, Sigma, SmoothedFunction)
dev_set_color (‘red’)
funct_1d_to_pairs (SmoothedFunction, XValues, YValues)
gen_region_histo (Histo1, YValues, 255, 255, 1)
dev_display (Aegypt1)
dev_set_color (‘white’)
gen_region_histo (Histo2, RelativeHisto, 255, 255, 1)1
2
3
4
5
6
7
8
9
10
11
12
13
14
15
16
17
18
19
20
21
22
23
24
25
26
27
28
29
30
31
32
33
34
35
36
37
38
39
40
41
42
43
44
45
46
47
48
49
50
51
52
53
54
55
56
57
58
59
60
4. 局部阈值分割方法
局部阈值分割方法适用于光照不均匀的图像,通过在每个局部区域内计算阈值,适应局部灰度变化。
- *实现方法**:
- 使用 `local_threshold` 算子,设定局部窗口大小和阈值计算方法。
- 例如:`local_threshold(Image, Region, 'adapted_std_deviation', 'dark', [50, 50], 2)`
- `'adapted_std_deviation'` 表示使用自适应标准差方法,`'dark'` 表示目标比背景暗。
- *适用场景**:
- 图像光照不均匀,存在阴影或反射。
- 需要适应局部灰度变化。
* ```
* This example shows the method 'adapted_std_deviation' of local_threshold
*
* Init display
dev_update_off ()
dev_close_window ()
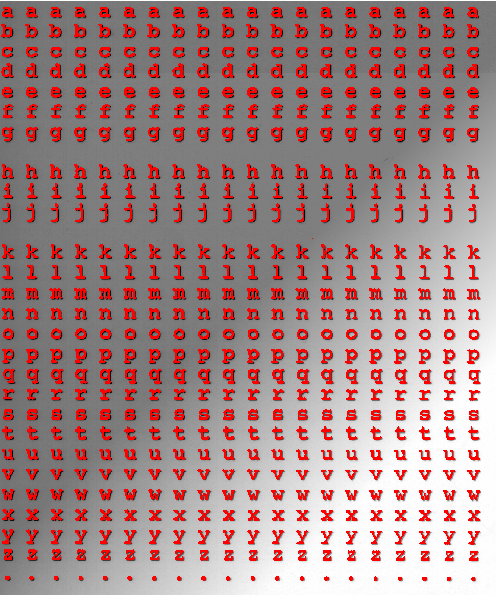
read_image (Letters, 'letters')
dev_open_window_fit_image (Letters, 0, 0, -1, -1, WindowHandle)
set_display_font (WindowHandle, 16, 'mono', 'true', 'false')
* 人工加入光学明暗对比区域 相当于在背景加入了噪声
* Add varying background to the next image to show
* the strength of the adapted_std_deviation method more clearly.
get_image_size (Letters, Width, Height)
*生成一个灰度图
gen_image_surface_first_order (ImageSurface, 'byte', 0.5, 0.5, 0.5, Width / 2, Height / 2, Width, Height)
*图像叠加
add_image (Letters, ImageSurface, ImageCombined, 0.5, 0)
* 先展示一下 我们通过之前学的全局阈值 是不可能把字母从光线不均匀得背景上提取出来
* Show that it is impossible to segment the characters
* with one global threshold from this image
GlobalThreshold := 128
threshold (ImageCombined, RegionGlobal, 0, GlobalThreshold)
dev_display (ImageCombined)
dev_display (RegionGlobal)
Message := 'In images with inhomogeneous background'
Message[1] := 'it is impossible to segment the characters'
Message[2] := 'with a global threshold.'
disp_message (WindowHandle, Message, 'window', 12, 12, 'black', 'true')
disp_continue_message (WindowHandle, 'black', 'true')
stop ()
*
* 'adapted_std_deviation'
*
* This method implements locally adaptive thresholding and
* is suited to segment objects with varying background 光线不均匀的背景
* local_threshold (ImageCombined, Region, 'adapted_std_deviation', 'dark', [], [])
*
* Display results
dev_display (ImageCombined)
dev_display (Region)
Message := 'With a local threshold, the characters'
Message[1] := 'can be segmented successfully.'
disp_message (WindowHandle, Message, 'window', 12, 12, 'black', 'true')
- ```
var_threshold算子
var_threshold 算子是一种基于局部方差的自适应阈值分割方法,适用于光照不均匀的图像。
- *实现方法**:
- 使用
var_threshold算子,设定局部窗口大小和方差阈值。 - 例如:
var_threshold(Image, Region, [50, 50], StdDevScale, AbsThreshold, LightDark) StdDevScale是标准差缩放因子,AbsThreshold是绝对阈值,LightDark表示目标比背景亮或暗。
- 使用
- *适用场景**:
- 图像中存在局部光照变化。
- 需要根据局部方差进行分割。
- char_threshold 算子
char_threshold 算子是一种基于字符特征的阈值分割方法,适用于字符识别等应用。
- *实现方法**:
- 使用
char_threshold算子,设定字符特征参数。 - 例如:
char_threshold(Image, Region, 'min_gray', 'max_gray', 'min_size', 'max_size') 'min_gray'和'max_gray'是灰度范围,'min_size'和'max_size'是字符大小范围。
- 使用
- *适用场景**:
- 字符识别、文本分割。
- 需要根据字符特征进行分割。
- dual_threshold算子
dual_threshold 算子是一种双阈值分割方法,适用于需要同时考虑高阈值和低阈值的场景。
- *实现方法**:
- 使用
dual_threshold算子,设定高阈值和低阈值。 - 例如:
dual_threshold(Image, Region, MinSize, Threshold1, Threshold2) MinSize是最小区域大小,Threshold1和Threshold2是高低阈值。
- 使用
- *适用场景**:
- 需要同时考虑高阈值和低阈值的分割任务。
- 例如边缘检测、区域分割等。
额外的一些比较重要的地方:
存储:
图像基础-形态学处理(Morphological processing)
介绍 :
很多很多对图像进行处理的算子
连通区域 connetion
1 | rgb1_to_gray (Image4, GrayImage) |

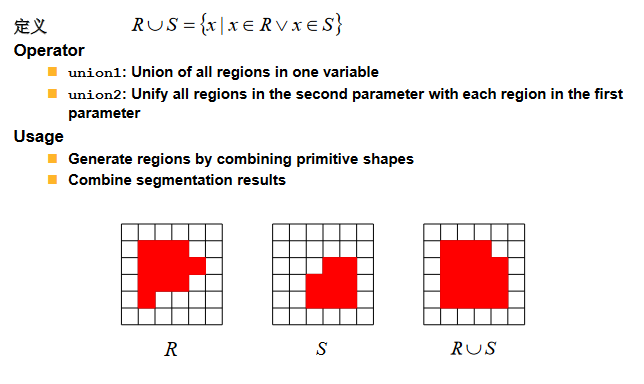
联合(并操作) Union1 和 Union2
1 | *岛屿分割 打散区域 |
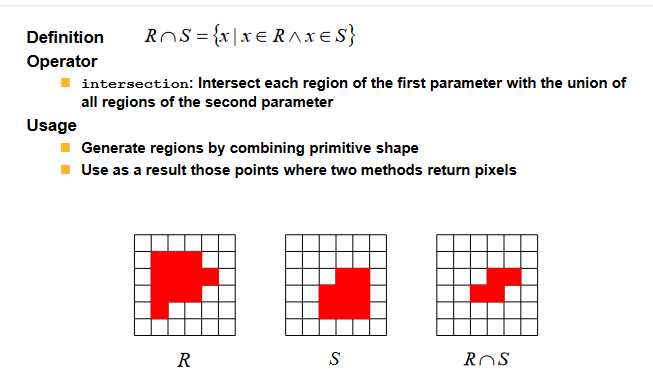
相交(交操作) Intersection
1 | gen_image_const (Image, 'byte', 5512, 5512) |
(差操作) Difference
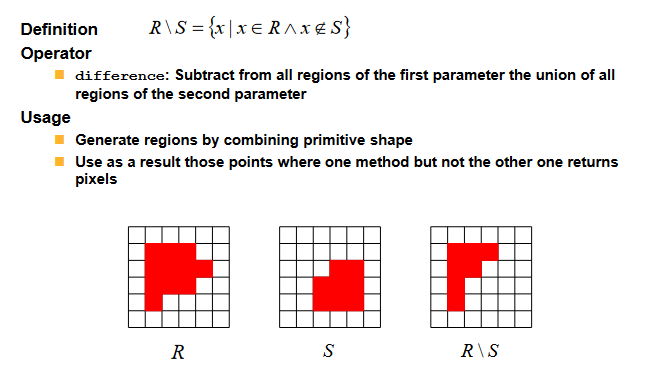
1 | gen_image_const (Image, 'byte', 5512, 5512) |
(对称差集)symm_difference
symm_difference 算子用于计算两个区域的对称差集,即两个区域中互不重叠的部分。
*数学定义**:
其中:
- R1R1 是第一个区域。
R2R2 是第二个区域。
*功能**:
- 返回属于 R1R1 但不属于 R2R2 的部分,以及属于 R2R2 但不属于 R1R1 的部分。
*示例**:
如果 R1R1 是一个大圆,R2R2 是一个小圆,且 R2R2 完全包含在 R1R1 中,那么
symm_difference(R1, R2)的结果是 R1R1 中除去 R2R2 的部分,以及 R2R2 中除去 R1R1 的部分(但由于 R2R2 完全包含在 R1R1 中,后者为空)。```
gen_rectangle1 (ROI_0, 123.796, -63.3635, 290.072, 224.722)
gen_rectangle1 (TMP_Region, 206.111, 0.838449, 230.805, 38.7011)
*区域相减 大矩形里面掏掉小矩形
difference (ROI_0, TMP_Region, region1)gen_circle (TMP_Region, 270.317, 257.646, 113.494)
gen_rectangle1 (TMP_Region1, 260.439, 292.216, 295.011, 330.079)
*区域相减 大圆里面掏掉小矩形
difference (TMP_Region, TMP_Region1, region2)dev_clear_window ()
dev_display (region1)dev_display (region2)
*合并
union2 (region1, region2, RegionUnion)
*对称差集 *被减数减去重叠部分 加上减数减去重叠部分 再并到一起
symm_difference (region1, region2, RegionDifference)
dev_clear_window ()
dev_display (RegionDifference)
*被减数减去重叠部分 剩下的
difference (region1, region2, RegionDifference1)
dev_clear_window ()
dev_display (RegionDifference1)1
2
3
4
5
6
7
8
9
10
11
12
13

(两个图像求差集)

(两个图像求对称差集)
### (平移操作) Translation

gen_image_const (Image, ‘byte’, 5512, 5512)
gen_circle (ROI_1, 1308.44, 1993.03, 606.403)
gen_rectangle2 (ROI_2, 1241.41, 1191.05, rad(-47.2488), 474.834, 367.291)
difference (ROI_1, ROI_2, RegionDifference)
dev_clear_window ()
dev_display (RegionDifference)
*移动区域
*1.输入区域
*2.输出移动后的区域
*3.纵向 ROW 方向 移动相对值 Offset
*4.横向 Col方向 移动的相对值 Offset
move_region (RegionDifference, RegionMoved,2730, 2230)
area_center (RegionDifference, Area, Row, Column)
area_center (RegionMoved, Area, Row2, Column2)
offsetR:=Row2-Row
offsetC:=Column2-Column
1 |
|
gen_image_const (Image, ‘byte’, 5512, 5512)
gen_circle (ROI_1, 1308.44, 1993.03, 606.403)
gen_rectangle1 (ROI_0, 348.111, 809.103, 2729.19, 4321.41)
difference (ROI_0, ROI_1, RegionDifference)
dev_clear_window ()
dev_display (RegionDifference)
*取反 取补集
complement (RegionDifference, RegionComplement)
1 |
|
gen_image_const (Image, ‘byte’, 5512, 5512)
gen_circle (ROI_1, 1308.44, 1993.03, 606.403)
gen_rectangle1 (ROI_0, 348.111, 809.103, 2729.19, 4321.41)
difference (ROI_0, ROI_1, RegionDifference)
dev_clear_window ()
dev_display (RegionDifference)
*用一个结构进行膨胀
- gen_circle (ROI_0, 3360.64, 2058.8, 242.565)
- dilation1 (RegionDifference, ROI_0, RegionDilation, 1)
- area_center (ROI_0, Area, Row, Column)
*参考点 是结构的 中心点 不是目标的中心点 - dilation2 (RegionDifference, ROI_0, RegionDilation1, Row, Column, 1)
*用圆形结构进行膨胀 - dilation_circle (RegionDifference, RegionDilation,222)
*用轴平行矩形进行膨胀 - dilation_rectangle1 (RegionDifference, RegionDilation1, 231, 311)
1 |
|
gen_image_const (Image, ‘byte’, 5512, 5512)
gen_circle (ROI_1, 1308.44, 1993.03, 606.403)
gen_rectangle1 (ROI_0, 348.111, 809.103, 2729.19, 4321.41)
difference (ROI_0, ROI_1, RegionDifference)
dev_clear_window ()
dev_display (RegionDifference)
stop()
*用一个结构进行腐蚀
gen_circle (ROI_0, 3360.64, 2058.8, 242.565)
erosion1 (RegionDifference, ROI_0, RegionDilation, 1)
- area_center (ROI_0, Area, Row, Column)
*参考点 是结构的 中心点 不是目标的中心点 - erosion2 (RegionDifference, ROI_0, RegionDilation1, Row, Column, 1)
*用圆形结构进行腐蚀
erosion_circle (RegionDifference, RegionDilation,322)
*用轴平行矩形进行腐蚀
erosion_rectangle1 (RegionDifference, RegionDilation1, 231, 311)
dev_clear_window ()
dev_display (RegionDilation)
stop()
1 |
|
gen_image_const (Image, ‘byte’, 5512, 5512)
gen_circle (ROI_1, 1308.44, 1993.03, 606.403)
gen_rectangle1 (ROI_0, 348.111, 809.103, 2729.19, 4321.41)
difference (ROI_0, ROI_1, RegionDifference)
read_image (Image3, ‘D:/人工智能1班/第17天_图像基本操作/课堂讲义/images/3.png’)
rgb1_to_gray (Image3, GrayImage)
threshold (GrayImage, Regions, 0, 184)
fill_up (Regions, RegionFillUp)
connection (RegionFillUp, ConnectedRegions)
boundary (ConnectedRegions, RegionBorder, ‘outer’)
1 |
|
rgb1_to_gray (Image16, GrayImage)
threshold (GrayImage, Regions, 0, 116)
skeleton (Regions, Skeleton)
dev_set_color (‘green’)
dev_display (GrayImage)
dev_display (Skeleton)
1 |
|
junctions_skeleton (Skeleton, EndPoints, JuncPoints)
connection (JuncPoints, ConnectedRegions)
area_center (ConnectedRegions, Area, Row, Column)
dev_set_color (‘red’)
dev_set_line_width (3)
gen_cross_contour_xld (Cross,Row , Column, 30, 0)
1 |
|
area:像素面积
row:区域中心的Row行坐标
column:区域中心的Column 列坐标
width:区域的宽
height:区域的高
ratio:区域的宽高比 width/height。 ratio>1 是个横向拉长的矩形 0<ratio<=1 是个纵向拉长的矩形 ratio=1 是个正方形
row1:区域最小外接矩形的 左上角的 (row1,col1) row1
column1:区域最小外接矩形的 左上角的 (row1,col1) column1
row2:区域最小外接矩形的 右下角的 (row2,col2) row2
column2:区域最小外接矩形的 右下角的 (row2,col2) column2
ra:区域外接椭圆的长轴半径 Ra 是椭圆的主轴半径,也就是椭圆长轴的一半。它描述了椭圆在主轴方向上的延伸长度。
rb:区域外接椭圆的短轴半径 Rb 是椭圆的次轴半径,也就是椭圆短轴的一半。它描述了椭圆在次轴方向上的延伸长度。
phi:区域外接椭圆的角度指向 是弧度制
roundness: roundness 是一个用于评估区域形状特征的算子,它通过分析区域的轮廓(contour)与区域中心之间的距离来计算一些形状参数。具体来说,roundness 算子的作用是计算以下四个特征值:
Distance(平均距离):
这是轮廓上所有点到区域中心的平均距离。
它描述了轮廓的整体大小。
Sigma(距离的标准差):
这是轮廓上所有点到区域中心距离的标准差。
它描述了轮廓的平滑程度。如果轮廓非常规则(如圆形),标准差会很小;如果轮廓不规则,标准差会较大。
Roundness(圆度):
圆度是平均距离与标准差的比值,计算公式为:
Roundness=DistanceSigma
Roundness=SigmaDistance
圆度描述了区域的形状接近圆形的程度。如果区域是一个完美的圆,圆度会非常大(因为标准差接近 0);如果区域不规则,圆度会较小。
Sides(多边形边数):
这是一个估计值,表示如果区域是一个规则多边形,它可能有多少条边。
例如,如果区域接近正六边形,Sides 的值会接近 6。
num_sides: 多边形的边数。如果传入一个三角形 sides=3 传入一个四边形区域 sides=4 ..
connect_num:表示 将这个区域进行connection 操作后 有多少个联通区域。
holes_num: 表示区域中是否有孔洞,输出有多少个孔洞。 通过算子connect_and_holes拿到结果。 是一个用于计算区域(Regions)的连通分量数量和孔洞数量的算子。它的作用是分析输入区域的拓扑结构,返回每个区域的连通分量数和孔洞数。以下是详细解释:
NumConnected(连通分量数量):
表示输入区域中连通区域的数量。
连通区域是指区域内相互连接的部分。例如,一个区域可能由多个分离的块组成,每个块就是一个连通分量。
如果输入区域是一个整体(没有分离的部分),则 NumConnected = 1。
NumHoles(孔洞数量):
表示输入区域中孔洞的数量。
孔洞是指区域内部的空白部分。例如,一个环状区域有一个孔洞,而一个实心区域没有孔洞。
area_holes:= 区域中孔洞的面积
max_diameter:=找到区域两个最远的点 通过算子 diameter_region计算出 两点坐标和两点的距离作为区域最大的直径
是一个用于计算区域(Regions)最大直径的算子。它的作用是找到区域边界上距离最远的两个点,并返回这两个点的坐标以及它们之间的距离。以下是详细解释:
最大直径:
最大直径是区域边界上任意两点之间的最大距离。
它描述了区域的“跨度”或“大小”。
输出结果:
Row1, Column1:第一个边界点的坐标(行和列)。
Row2, Column2:第二个边界点的坐标(行和列)。
Diameter:这两个点之间的距离(即最大直径)。
orientation: 区域的角度返回弧度制
outer_radius: 最小外接圆的半径
通过以下两个算子拿到最小外接圆的半径
smallest_circle (Regions, Row6, Column5, Radius)
gen_circle (Circle, Row6, Column5, Radius)
------
## Halcon 函数封装
### 为什么函数封装?
1.因为需要把代码形成块,不然从上写到下面会挤在一起,显示的非常拥挤,不便阅读。
2.halcon程序内部执行是一句话一句话执行,如果不进行封装,在循环操作的时候会很慢,封装后会直接进入到函数体内部执行,缩短在halcon编译器的执行时间。
3.可以反复调用
### 方法:
1.先把halcon代码写好
2.把要用户输入的可以变换的控制变量或者图元变量提升到你写的代码的最开头的位置
3.选择剩下不动的代码片段,然后点击halcon编译器的函数工具栏
4.输入一个自定义函数名(不能与halcon的库函数冲突)
5.重点来了,要在参数列表里面,构想哪些是你想要输入的,哪些是你想要输出的。 分控制变量输入输出和图元变量输入输出。
6.后面可以加上注释或者填入帮助文档
7.最后再点击 应用->确定 就完成了一个halcon自定义函数的封装
8.halcon 紫色颜色的函数表示只能在当前halcon程序中使用
9.halcon 淡蓝色的函数表示已经导入到函数库里面,可以在任意打开的halcon程序中进行访问。输入后会有自动补全的提示出现。我们
只需要按住Tab 键进行自动补全函数名将会自动带出来。
10.halcon自定义函数的导入,通过 点击halcon工具栏目中的 函数->管理函数->目录->添加函数到halcon的库函数->点击重新刷新就可以导入了
### 例子:


### 要注意的地方:
自己要想好封装函数的 合理的 输入输出。 不建议搞太多的输入输出。人家看着一大长串会很累
- 微信
- 支付宝